

- Home
- Companies
- Faster Hot Water
- Products
- WaterQuick - Model Pro II-Advanced - ...
WaterQuick - Model Pro II-Advanced -Hot Water Circulation System
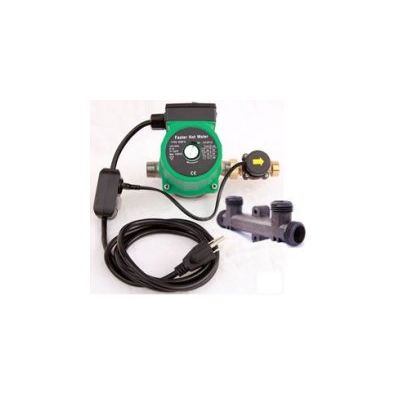
The WaterQuick Pro II ™ - Advanced is the first `true on-demand` hot water circulating system for existing homes that delivers hot water in 30 seconds or less*.
A small, high speed, ultra-quiet hot water circulation pump is installed on the hot water outlet of a tank style water heater. A Bridge Valve connects the hot and cold water supply lines under the most remote kitchen or bath fixture in the house.
When the integrated Flow Manager detects hot water use anywhere in the house, it turns on the hot water pump. The cool water that normally would go down the drain is circulated back to the water heater through the cold water line.
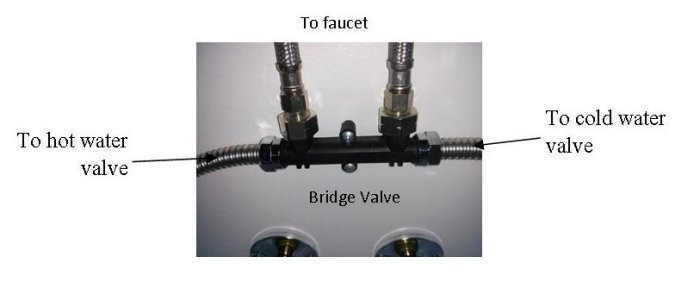
The Bridge Valve has a built-in temperature sensor that closes when hot water reaches the farthest sink. Unless a hot water faucet is on the Water Monitor will turn off the pump because hot water is everywhere you need it!
Advanced Bridge Valve
An Advanced Bridge Valve allows as much as 30% more water flow so the cool water in the hot line can be moved back to the water heater faster.
Pump Technical Data:
- Flow Range: 0 to 10 US gpm
- Head Range: 0 to 20 US feet
- Motor Single phase, 115 vAC
- Min. Fluid Temp. 36° F (2° C)
- Max. Fluid Temp. 230° F (110° C)
- Max. Working Pressure 145 psi
Electrical Data:
- Volts 115 vAC
- Watts: 93W
- Amps 0.81A
- Electrical Connection: 10 foot cord; 115 vAC plug
Step 1. Inspect your water heater supply lines:
If the supply lines are old and inflexible they will need to be replaced.
Step 2. Turn off water heater:
Electric- turn off power by either unplugging the water heater or shutting off the appropriate breaker
Gas, propane or heating oil- turn off water heater and make sure the pilot light is turned off.
Step 3. Turn off water:
Turn off the water to the water heater. In most cases there is a valve located above the water heater on the cold water supply line.
Step 4. Drain the hot water lines:
Turn on any hot water faucet in the house and let it run until the water stops flowing. Leave the faucet on for the duration of the installation. Drain remaining hot water using the hot water spigot on the water heater.
Note: If water continues to flow, check to make sure that the water has been completely turned off. If the valve does not shut off the water flow completely turn off the valve supplying water to the house or at the water meter.
Step 5. Disconnect the hot water supply line:
Unscrew the hot water supply line at the hot water discharge (typically the left supply line).
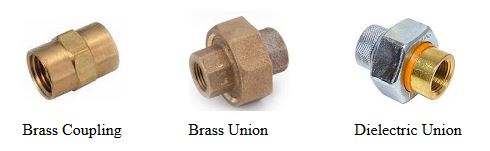
Step 6. Install a 3/4" FIP x FIP fitting (coupling, union or dielectric union - available at any home improvement store):
Wrap Teflon tape or apply pipe dope to male hot water discharge pipe. Carefully thread the 3/4" fitting onto the hot water discharge pipe coming out of the water heater.
Step 7. Install pump:
Wrap Teflon tape or apply pipe dope to both male fittings on the pump. Install the pump directly into the 3/4" fitting making sure the arrow on the pump is pointing up (the direction of water flow).
Note: Make sure that the pump does not touch the water heater venting on gas, propane or oil fired water heaters.
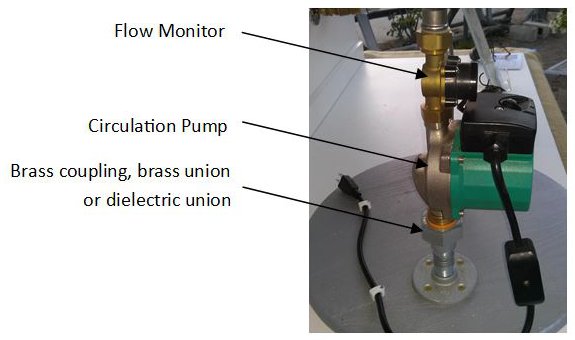
Step 8. Install the Flow Monitor:
RemoveFlow Monitorfrom the box. Please note that there are 2 washers provided - only one is used. Set the other one aside and save it. Also there is a bolt and nut in the package that is used to tighten the female connector to the body of theFlow Monitor.
Insert the bolt into the hex opening in the female end of theFlow Monitor. Use a 1/2" wrench to tighten. Just snug it up. Overtightening will damage the o-ring in theFlow Monitor.
Make sure one gasket is inserted in the female end of theFlow Monitor. Carefully thread theFlow Monitoron to the pump with the arrow pointing up (the direction of water flow). Do not over tighten.
Note:Flow Monitorwill not work properly if the arrow is pointing down.
Note: TheFlow Monitorcan also be installed on the cold water pipe feeding the water heater. If you chose this option remove the 4 screws on the top of theFlow Monitorand turn the unit 180°. Make sure to rotate everything inside of theFlow Monitor. Just rotating the cap with the arrow will not change the direction of theFlow Monitor.
Please contact us if you have any questions about rotating theFlow Monitor.
Step 9. Reconnect hot water supply line and turn on water:
Screw hot water supply line onto theFlow Monitor. Make sure that a hot water faucet is turned on in the house and then slowly turn the water back on to the water heater. Check for leaks and repair as necessary. Leave the water running until all of the air has been purged from the water pipes. Turn off the faucet.
Step 10. Connect the pump and the Flow Monitor:
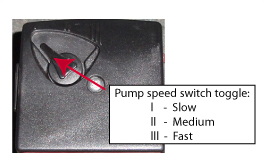
There are 2 toggle switches that controls the speed of the pump and how it works. The first toggle is located in the power cord and contains the connection box that the flow switch wire connects into.
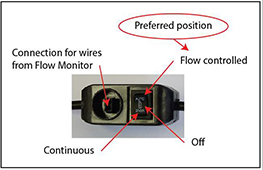
Connect the wire from theFlow Monitorto the connector in the electrical wire from the pump. Set toggle switch to theAutosetting.
Step 11. Plug the pump in:
Plug the pump into a properly grounded 110 vAC outlet.
Note: Route the cord away from any vents on gas, propane or oil fired water heaters.
Step 12. Test pump operation:
Turning on any hot water faucet in the house to start the pump. Turning off the faucet will stop the pump (assuming that theBridge Valvehas not been installed yet).
Note: If theBridge Valvehas been installed the pump will continue to run until 95°F water reaches the sink where theBridge Valveis installed. The temperature sensor in theBridge Valvewill shut off and the water will stop flowing (unless a hot water faucet is open).
Location:
TheBridge Valveshould be installed under the kitchen or bathroom sink at the farthest fixture from the water heater. Branched plumbing systems will need aBridge Valveat the end of each line.
Ball Valve Installation:
- Turn off water to the house and drain the water from the pipes.
- Turn off both the hot and cold angle stops (valves) below the sink.
- Disconnect existing hot and cold water supply lines from the angle stops and replace angle stops with ball valves.
- Install 1/2" brass nipples in ball valves using Teflon tape and/or pipe dope. Attach new stainless steel advanced 1/2" x 1/2" supply lines to nipples.
- Attach other end of advanced supply lines to the appropriate "Cold Water In" and "Hot Water In" ports of theBridge Valve. Tighten finger tight plus a quarter turn with a wrench. Do not over tighten.
- Attach standard 1/2" x 1/2" standard supply lines to the appropriate "Cold Water Out" and "Hot Water Out" ports of theBridge Valve. Tighten finger tight plus a quarter turn with a wrench. Do not over tighten.
- Attach other end of standard supply lines to the faucet. Tighten finger tight plus a quarter turn with a wrench. Do not over tighten.
- Leave ball valves in the off position and turn the house water back on. Check for leaks.
- Open both the hot water and cold water ball valves and check for leaks.
The following steps will determine if theBridge Valveis operating correctly.
- Close the cold water ball valve below the sink.
- Quickly turn the hot water faucet on and then off to activate the pump.
- Open the cold water faucet.
- Water should flow from the faucet until warm water (95°F) reaches theBridge Valve. The flow should gradually decrease until no water is coming from the faucet at which time theBridge Valvehas closed.
Warning: Risk of electrical shock.
This pump is supplied with a grounding conductor. To reduce the risk of electrical shock, be certain that it is connected only to a properly grounded grounding type receptacle.
The safe operation of this pump requires that it be grounded in accordance with the national Electrical Code and local government regulations.
To activate the WaterQuick Pro II hot water delivery system, simply turn on any hot water faucet in the house and quickly turn it off.
This will start the pump and within a few seconds you will have hot water everywhere in your home. The amount of time that you wait varies from home to home and is dependent on how far the sink is from the water heater, the size of your water pipes and how many turns there are in the water pipes.