

- Home
- Companies
- Faster Hot Water
- Products
- WaterQuick Tankless - Model WQT - Hot ...
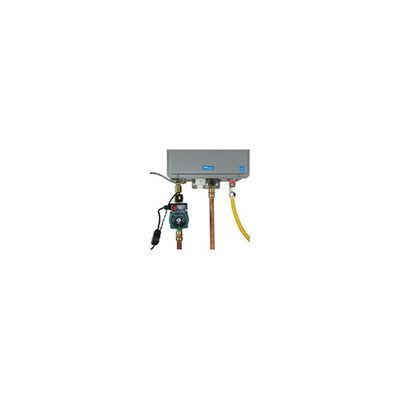
WaterQuick Tankless - Model WQT -Hot Water Circulation System
Faucet Activated - no buttons or remotes. Installs at the water heater - not under a sink. Easy install - DIY or Pro installation. 3-year warranty. Customer service - friendly and knowledgable.
Waiting for hot water is painful no matter how efficiently it was heated.
Water is quickly heated by an on-demand water heater when a hot water faucet is turned on but it can still take "forever" to get hot water at your sink or shower.
Home owners that have recently purchased a tankless water heater are surprised that it actually takes longer for the water to reach the faucet than it did with a traditional tank style water heater.
Why it takes longer to get hot water from a tankless water heater:
On-demand water heaters turn on when a hot water faucet is turned on. But before it starts heating the water it must make sure that the water is flowing.
It takes a lot of energy to heat water instantly and it would not be good to apply that concentrated energy if the water is not moving. Of course water heaters have safety mechanisms built in to prevent this from happening.
One safety feature is to delay turning on the heat until the water has been moving for a few seconds. This adds to the time that hot water takes to get to your faucet.
How to get hot water faster from a tankless water heater:
You are heating the water quickly but wasting more water down the drain and waiting longer for hot water.
We love tankless water heaters because they are more energy efficient, you will never run out of hot water (when properly sized) and they take up less space.
But in order to get hot water faster without wasting water down the drain you need a circulation system. One that returns the cold water in the hot water line to the water heater and one that has a high speed pump to move the water faster than just water pressure alone can.
And it needs to be a system that does not operate continuously (continuous operation voids the water heater`s warranty) and that does not keep your water lines hot unless there is a demand for hot water (wastes energy and promotes pinhole leaks).
The system you need is WaterQuick Tankless - the only hot water circulation system specifically designed for tankless water heaters.
Continuously running hot water through an on-demand water heater will void the warranty and quickly wear out the equipment.
Here are some of the benefits of using a system that was designed to work with tankless water heaters:
- Fast Hot Water - moves water quickly from your tankless water heater to your sink or shower
- No Wasted Water - pushes cool water in the hot water line back to the water heater.
- Automated On and Off - Turns on and off by any hot water faucet in your home
- Pump Installs by Water Heater - not under a sink in a bathroom or kitchen
- Uses Water Heater Electrical Outlet - no new electrical outlets required
The following table compares a tankless water heater without a hot water circulation system (column A) to one with WaterQuick Tankless (column B).
Pump Technical Data:
- Flow Range : 0 to 10 US gpm
- Head Range : 0 to 20 US feet
- Motor : Single phase, 115 vAC
- Min. Fluid Temp. : 36° F (2° C)
- Max. Fluid Temp. : 230° F (110° C)
- Max. Working Pressure : 145 psi
Electrical Data:
- Volts : 115 vAC
- Watts : 93W
- Amps : 0.81A
- Electrical Connection : 10 foot cord; 115 vAC plug
Step 1. Choose the location of the pump:
The circulation pump can be installed in either the cold water feed or the hot water out from the water heater. Ease of installation is the only consideration when making your decision.
Step 2. Turn off water heater:
Turn off water heater to make sure it does not come on during installation.
Step 3. Turn off water:
Turn off the water to the water heater. In most cases there is a valve located near the water heater on the cold water supply line.
Step 4. Drain the hot water lines:
Turn on any hot water faucet in the house and let it run until the water stops flowing. Leave the faucet on for the duration of the installation. Drain remaining hot water using the hot water spigot on the water heater.
Note: If water continues to flow, check to make sure that the water has been completely turned off. If the valve does not shut off the water flow completely turn off the valve supplying water to the house or at the water meter.
Step 5. Cut the water line where the pump is to be installed:
Remove a section of pipe equivalent to the length of the pump andFlow Monitorassembled plus any extra length for required fittings.
Step 6. Orientation of pump and Flow Monitor:
Make sure the arrows on the pump andFlow Monitorare pointing in the direction of flow.
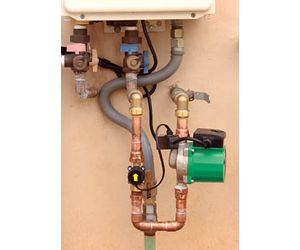
Step 7. Install pump:
Correct installation of the pump can be either horizontal or vertical. Use proper straps for support if necessary.
Step 8. Install the Flow Monitor:
Make sure the gasket is inserted in the female end of theFlow Monitor. Carefully thread theFlow Monitoron to the pump with the arrow pointing up in the direction of water flow. Do not over tighten.
Step 9. Complete connections and turn on water:
Make sure that a hot water faucet is turned on in the house and then slowly turn the water back on to the water heater. Check for leaks and repair as necessary. Leave the water running until all of the air has been purged from the water pipes. Turn off the faucet.
Step 10. Connect the Pump Manager and the Flow Monitor:
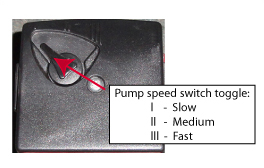
There are 2 toggle switches that controls the speed of the pump and how it works. The first toggle is located in the power cord.
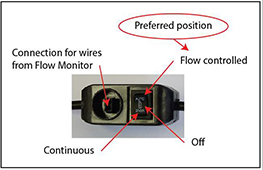
Connect the wire from the Flow Monitor to the connector in the electrical wire from the pump. Set toggle switch to the I (1 bar) setting.
Step 11. Plug the pump in:
Plug the pump into a properly grounded 110 vAC outlet.
Step 12. Test pump operation:
Turning on any hot water faucet in the house to start the pump. Turning off the faucet will stop the pump (assuming that theBridge Valvehas not been installed yet).
Note: If theBridge Valvehas been installed the pump will continue to run until 95°F water reaches the sink where theBridge Valveis installed. The temperature sensor in theBridge Valvewill shut off and the water will stop flowing (unless a hot water faucet is open).
The Bridge Valve should be installed under the kitchen or bathroom sink at the farthest fixture from the water heater. Branched plumbing systems will need a Bridge Valve at the end of each line.
Note: Do not use Teflon tape or pipe dope on Bridge Valve connections.
Ball Valve Installation:
- Turn off water to the house and drain the water from the pipes.
- Turn off both the hot and cold angle stops (valves) below the sink.
- Disconnect existing hot and cold water supply lines from the angle stops and replace angle stops with ball valves.
- Install 1/2" brass nipples in ball valves using Teflon tape and/or pipe dope. Attach new stainless steel advanced 1/2" x 1/2" supply lines to nipples.
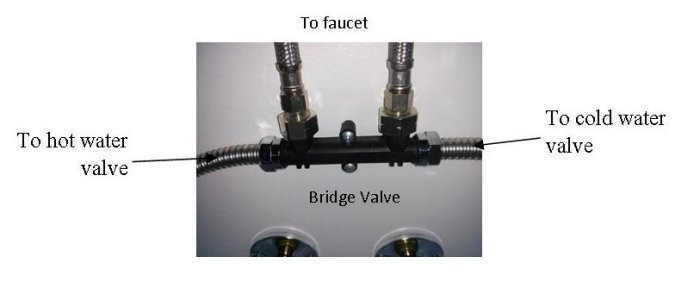
- Attach other end of advanced supply lines to the appropriate "Cold Water In" and "Hot Water In" ports of theBridge Valve. Tighten finger tight plus a quarter turn with a wrench. Do not over tighten.
- Attach standard 1/2" x 1/2" standard supply lines to the appropriate "Cold Water Out" and "Hot Water Out" ports of theBridge Valve. Tighten finger tight plus a quarter turn with a wrench. Do not over tighten.
- Attach other end of standard supply lines to the faucet. Tighten finger tight plus a quarter turn with a wrench. Do not over tighten.
- Leave ball valves in the off position and turn the house water back on. Check for leaks.
- Open both the hot water and cold water ball valves and check for leaks.
The following steps will determine if theBridge Valveis operating correctly.
- Close the cold water ball valve below the sink.
- Quickly turn the hot water faucet on and then off to activate the pump.
- Open the cold water faucet.
- Water should flow from the faucet until warm water (95°F) reaches theBridge Valve. The flow should gradually decrease until no water is coming from the faucet at which time theBridge Valvehas closed.
Warning: Risk of electrical shock.
This pump is supplied with a grounding conductor. To reduce the risk of electrical shock, be certain that it is connected only to a properly grounded grounding type receptacle. The safe operation of this pump requires that it be grounded in accordance with the national Electrical Code and local government regulations.
Operating Instructions
To activate the WaterQuick Pro II hot water delivery system, simply turn on any hot water faucet in the house and quickly turn it off. This will start the pump and within a few seconds you will have hot water everywhere in your home. The amount of time that you wait varies from home to home and is dependent on how far the sink is from the water heater, the size of your water pipes and how many turns there are in the water pipes.